Thursday 15 August 2013

setup a Hyper-V cluster with Iscsi Target Server in ESXI

Good Evening.

Finally managed to find some time for this config. here's what i want to setup in site JHB:

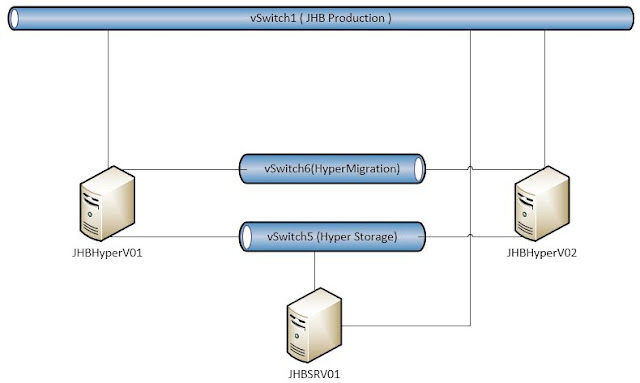
Basic Network Diagram :


As you can see from the diagram :

 Network:
JHB Production vSwitch ( NIC Label : JHBPROD ): 192.168.1.0/24
Hyper Storage vSwitch ( NIC Label : HVStorage ): 172.16.6.0/24
Hyper Migration vSwitch ( NIC Label : HVMigration ): 172.16.5.0/24

The NIC label above is just to rename your NIC's on the three servers.

Servers:
 ISCSI Target server ( Windows Server 2012 ) (Will get back to this one later.)


 2x Windows Server 2012  Server(s) to serve as ClusterNode(s) for Hyper-V configured with:
  • Three NICs:
    • 1.To present VM's to Production Network
    • 2. Storage Traffic
    • 3. Vmotion Traffic
  • 4GB memory (in this case.[not too sure what the utmost minimum is. MS recommends 8GB?])
  • 40GB VMDK
How to Nest Hyper-V inside ESXI: ( Done on Both the Windows Server 2012 Servers that will be acting as your cluster Nodes )

Once you have created the two VM's and installed Windows Server 2012  on them , we need to make a quick change to the VMX file for each of the VM's:


  1. start the SSH Deamon on the ESXI host via the vsphere client.
  2. make sure that your ESXI firewall allows the ssh traffic to the host.
  3. connect to your ESXI host via SCP with WINSCP.exe:
  4. Navigate to : "/vmfs/volumes"/yourdatastore/yourhyperv vm/
  5. Now right click the VMX file and select "edit".
  6. Change the GuestOS parameter to GuestOS="winhyperv":
  7. Save the file.
  8. Repeat steps 1 - 7 for your second host/node.
Okay. so now we are ready to setup the three Windows Server 2012 VM's

1.Join all three computers to the domain.
2.Make sure you either disable your firewall on the NIC's that will be used for Non prodution traffic ( The NICs that will be used for Hyper-V Migration and Iscsi Storage ) , or allow the respective services on the firewall. In my case I allowed ISCSI traffic to pass and ICMP both inbound and outbound.
3. Make sure you the Servers can ping one another on the respective networks.
4.Label your NICS! , I labelled mine JHBPROD , HVStorage and HVMigration respectively. This really makes things easy. (A great tip I learned from a fellow technologist when I was fooling around with ISA 2006 ).


So when I started this Post I had the following networks for the Hyper-V Cluster

Hyper Migration for Live Migration
Hyper Storage for ISCSI traffic
and JHB Production

I also had my hosts named JHBhyper01 and JHBhyper02.
I had to trash the hosts as my first attempt at a cluster was without success.

So!, now I have the following naming convention (dont worry, its still in the same layout):

JHBhyper 01 and 02 changed to JHBHV01 and JHBHV02.

On the network side I renamed my Vswitches to HVMigration and HVStorage to remain consistent.


JHBSRV01 ( To provide central storage )
On this server I added one additional Virtual disk from my ESXI Datastore.


I then installed the ISCSI Target Server Role , And rebooted.


Okay , now we are ready to create the storage.

I know can you do this in ServerManager, but I did this in Diskmgmt.msc because it's familiar.


I also know that there's a number of ways to provide storage, in this case i shouldve added multiple disks to the JHBSRV01 VM , or created a storage pool , "add your option here :-P" .  This will do for now as I will probably scrape the cluster after this. Lets move on! 
 
Now we need to create ISCSI disks and associate Iscsi Targets to them.
 
In Server Manager , Navigate to :  Server Manager\File and Storage Services\ISCSI.
On the Tasks dropdown , select "New Iscsi Virtual Disk". The wizard will launch.


Oh , before we move on , remember to LABEL your drives properly throughout the solution, from here all the way to the cluster. I messed up my labelling in Diskmgmt.msc, shouldve made it more descriptive but anyways, also, the Quorum disk can be 1 GB , mine is 9GB...Moving on.
 
Okay, now create a Iscsi Virtual disk in every volume you created in Diskmgmt.msc, follow the GUI., when you get to the ISCSI Target window , select New Iscsi Target, Give it Descriptive name. Move onto Access Servers.  Whats important here is that you cannot use hostnames ( well if you hacked the host file then you could but .... Moving on! ). We cannot use the hostnames as we have a separate network for ISCSI traffic. so here , I supplied the IP addresses of the HVStorage NIC's on my hosts :
 
Add both the IP's of your hosts and click OK and move on.


Click next on the Authentication window. Now you should have something like this in your  Server Manager\File and Storage Services\ISCSI. Okay your's will not say connected , it will show up as not connected.


Repeat this process for the remainder of the Volumes.
 
Now, lets go to the JHBHV01 and JHBHV02 Servers and add the ISCSI Storage.
 
On JHBHV01,  Open Server Manager , select ISCSI Initiator from the Tools Dropdown , select Yes at Prompt.
 
 
   Now , In the ISCSI Initiator Properties window, that pops up after clicking yes as per above, in the target tab, specify the IP address of the NIC on the Iscsi Target Server to be used for Storage traffic. In my Case , 172.16.6.3.


 Our Iscsi Targets will appear in the Discovered Targets window, connect to them :


Okay, do the same for your second node.
 
From here onwards i followed these Video's :


Now you should have a functioning Hyper-v Cluster inside your ESXI server.
Saturday 6 July 2013

Network Design and concepts

So while I am downloading a bunch of ISO's ( Visio included :-) ) and prepping VM's, I thought we can have a look at some network concepts.
 
My networking experience is very limited so please excuse the basic approach i have taken.....
 
What I would like to achieve with the network is to be able to have full control over the links connecting three network segments. This will enable me to mimic a link failure between sites.


With concept 1 I can control links between my network segments, but will require more Memory overhead as this concept requires three vRouters/firewalls.
 
Concept 2 has less memory over overhead but also limited control between my segregated networks.
 
Once I have identified which virtual routing devices i will use I will start deploying the network.
 
 
UPDATE:

Okay so after some research I realised that my thoughts around the network conception for the Lab were flawed. Nonetheless I downloaded Vyatta Community edition to for my virtual routers. (http://www.vyatta.org/downloads) [note the versions]

i configed a linux other 2.6.x vm with the following :
-vcpu
-128mb memory
-2gb VMDK
-two Virtual NIC's

I booted up with the LiveCD.iso. you need to logon before you can invoke the install command.
I logged on using "vyatta" as the username and password. the "install system" command is used to install OS to disk. I used the default values at the prompts to complete installation.

Now that I installed one vRouter. it was time to draw my network layout:
 

I decided to keep it basic so i stuck with default class C subnets and matched the numbering in the last octect of the IP on the interfaces of my Routers,as indicated on diagram.
 
192.168.0.0/24 will be used for the "Core network"
192.168.1.0/24 will be used for site 1 "JHB"
192.168.2.0/24 will be used for site 1 "CPT"
192.168.3.0/24 will be used for site 1 "DBN"
 
I found this really cool blog that deals with networking labs, which was quite handy in the configuring of the routing and routers : http://roggyblog.blogspot.com/

I used these video's to setup the routers and routing :


 I created the Labhat.local domain and configured my sites:


ESXI networking screendump:


As you can see the network is isolated in vmware, with no link to the uplink NIC.


Hardware updated

Good Morning

After replacing my MSI z77 motherboard with a Gigabyte GA-B75M-D3H, I still encountered problems Post ESXI5.1 installation. Even though the ESXI5.1 detected the on-board NIC and installed with success, I encountered issues with comms to and from the NIC. I was unable to ping my default GW and unable to ping the ESXI host from any node on the same network segment.  After about 3 hours of throubleshooting and consulting with others, I discovered that the NIC was not auto detecting 1000MB full duplex . This was caused by my cheap 10/100/1000 8-port Gigabyte autosensing switch. After unplugging , replugging it sensed 1000MB Full Duplex on the NIC and comms started working to and from the NIC.  The Board is running F12 BIOS.

I have completed my ESXI5.1 installation which is now running on the following setup:

- Gigabyte GA-B75m-D3H rev1.1 ( BIOS version f12 )
- 4 x 8GB DDR 1600 Apacer memory
- Intel Core i3 3220 CPU
- 2 x 1TB SATA II HDD
- 1 x 80GB SATA II HDD
- 2GB Memory stick/key
- 450 watt PSU

In my next post I will discuss network considerations  for my Microsoft Lab.

Tuesday 25 June 2013

Procurement of hardware and introduction

Good Afternoon.

Over the next couple of days/weeks I will be deploying a Home Lab Using relatively cheap components to build a Test/Dev environment.

The main objective will be to check out some of the new features and benefits of the Microsoft Products.

I have purchased the following hardware:
- Intel Core i3 3220 Processor
- MSI Z77A-G43 Motherboard ( Bios Version 2.7, which does not work on ESXI5.1) [ Board to be swopped out for a compatible Gigabyte board TBA ]
- 32GB of Apacer memory
- 450watt Thermaltake Powersupply
- a Spare ATX case I had doing nothing.
- 2 x 1TB SATA 2 HDD
- 1 x 80GB Sata 2 HDD

I am hoping to setup the following technology  :

2 AD forests
    - Three AD sites ( Forest 1 ) [ sites: HQ and two Branch sites ]
    - Forest Root Domain ( Forest 2  )
    -ADFS
-IPAM for DHCP/DNS Management
-BranchCache
-Direct Access
-System Center Configuration manager
-System Center Operation manager
-System Center VMM
-Exchange server 2013
-Running Hyper-V 2012 nested inside VM.
-WDS

The Goal posts will change I see fit.

I will be using Vswitches together with vRouter software to emulate network infrastructure.
I still need to decide where the "internet" breakout will be for the organisation.

First step of the deployment procedure will be how to downgrade the BIOS from version 2.7 to version 2.5. Some G00gling led to people confirming that after the introduction of UEFI to the NIC , EXSI 5.1 does not pickup the NIC.