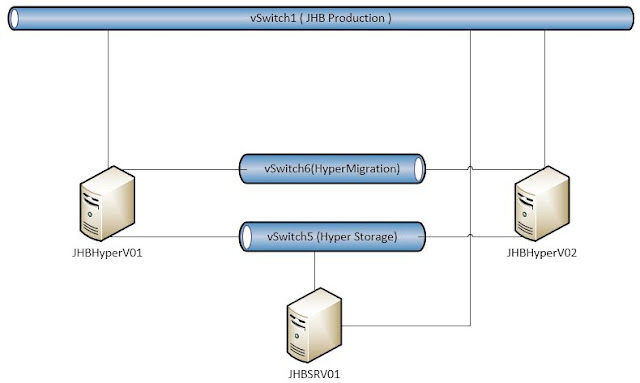
Finally managed to find some time for this config. here's what i want to setup in site JHB:
Basic Network Diagram :
Network:
JHB Production vSwitch ( NIC Label : JHBPROD ): 192.168.1.0/24
Hyper Storage vSwitch ( NIC Label : HVStorage ): 172.16.6.0/24
Hyper Migration vSwitch ( NIC Label : HVMigration ): 172.16.5.0/24
The NIC label above is just to rename your NIC's on the three servers.
Servers:
ISCSI Target server ( Windows Server 2012 ) (Will get back to this one later.)
2x Windows Server 2012 Server(s) to serve as ClusterNode(s) for Hyper-V configured with:
- Three NICs:
- 1.To present VM's to Production Network
- 2. Storage Traffic
- 3. Vmotion Traffic
- 4GB memory (in this case.[not too sure what the utmost minimum is. MS recommends 8GB?])
- 40GB VMDK
Once you have created the two VM's and installed Windows Server 2012 on them , we need to make a quick change to the VMX file for each of the VM's:
- start the SSH Deamon on the ESXI host via the vsphere client.
- make sure that your ESXI firewall allows the ssh traffic to the host.
- connect to your ESXI host via SCP with WINSCP.exe:
- Navigate to : "/vmfs/volumes"/yourdatastore/yourhyperv vm/
- Now right click the VMX file and select "edit".
- Change the GuestOS parameter to GuestOS="winhyperv":
- Save the file.
- Repeat steps 1 - 7 for your second host/node.
1.Join all three computers to the domain.
2.Make sure you either disable your firewall on the NIC's that will be used for Non prodution traffic ( The NICs that will be used for Hyper-V Migration and Iscsi Storage ) , or allow the respective services on the firewall. In my case I allowed ISCSI traffic to pass and ICMP both inbound and outbound.
3. Make sure you the Servers can ping one another on the respective networks.
4.Label your NICS! , I labelled mine JHBPROD , HVStorage and HVMigration respectively. This really makes things easy. (A great tip I learned from a fellow technologist when I was fooling around with ISA 2006 ).
So when I started this Post I had the following networks for the Hyper-V Cluster
Hyper Migration for Live Migration
Hyper Storage for ISCSI traffic
and JHB Production
I also had my hosts named JHBhyper01 and JHBhyper02.
I had to trash the hosts as my first attempt at a cluster was without success.
So!, now I have the following naming convention (dont worry, its still in the same layout):
JHBhyper 01 and 02 changed to JHBHV01 and JHBHV02.
On the network side I renamed my Vswitches to HVMigration and HVStorage to remain consistent.
JHBSRV01 ( To provide central storage )
On this server I added one additional Virtual disk from my ESXI Datastore.
I then installed the ISCSI Target Server Role , And rebooted.
Okay , now we are ready to create the storage.
I know can you do this in ServerManager, but I did this in Diskmgmt.msc because it's familiar.
I also know that there's a number of ways to provide storage, in this case i shouldve added multiple disks to the JHBSRV01 VM , or created a storage pool , "add your option here :-P" . This will do for now as I will probably scrape the cluster after this. Lets move on!
Now we need to create ISCSI disks and associate Iscsi Targets to them.
In Server Manager , Navigate to : Server Manager\File and Storage Services\ISCSI.
On the Tasks dropdown , select "New Iscsi Virtual Disk". The wizard will launch.
Oh , before we move on , remember to LABEL your drives properly throughout the solution, from here all the way to the cluster. I messed up my labelling in Diskmgmt.msc, shouldve made it more descriptive but anyways, also, the Quorum disk can be 1 GB , mine is 9GB...Moving on.
Okay, now create a Iscsi Virtual disk in every volume you created in Diskmgmt.msc, follow the GUI., when you get to the ISCSI Target window , select New Iscsi Target, Give it Descriptive name. Move onto Access Servers. Whats important here is that you cannot use hostnames ( well if you hacked the host file then you could but .... Moving on! ). We cannot use the hostnames as we have a separate network for ISCSI traffic. so here , I supplied the IP addresses of the HVStorage NIC's on my hosts :
Add both the IP's of your hosts and click OK and move on.
Click next on the Authentication window. Now you should have something like this in your Server Manager\File and Storage Services\ISCSI. Okay your's will not say connected , it will show up as not connected.
Repeat this process for the remainder of the Volumes.
Now, lets go to the JHBHV01 and JHBHV02 Servers and add the ISCSI Storage.
On JHBHV01, Open Server Manager , select ISCSI Initiator from the Tools Dropdown , select Yes at Prompt.
Now , In the ISCSI Initiator Properties window, that pops up after clicking yes as per above, in the target tab, specify the IP address of the NIC on the Iscsi Target Server to be used for Storage traffic. In my Case , 172.16.6.3.
Our Iscsi Targets will appear in the Discovered Targets window, connect to them :
Okay, do the same for your second node.
From here onwards i followed these Video's :
Now you should have a functioning Hyper-v Cluster inside your ESXI server.


No comments:
Post a Comment